Showing posts with label Hank Drum. Show all posts

Monday, August 18, 2008

Moyo Drum - Hank Drums by Rick Dunlop


My good friend, Rick Dunlop, has started producing some wonderfully crafted Hank Drums. Rick is a talented musician and metal worker who has combined these two passions into a wonderful fusion of metal and music. I'll be lucky enough to join Rick Dunlop and Steven DeRuby on stage for the opening act of the upcoming Yosemite Flute Festival. Where Rick will be jamming on the Moyo Drum and Steven and I will be on compatible keyed Native American Flutes.


Rick calls his drums "Moyo Drums". Moyo is a Swahili word for “heart”. His innovation is the inclusion of attachable legs which support the drum at a comfortable height for playing.
For more info, check out his website: http://www.moyodrum.com

Saturday, July 19, 2008

Hank Drums from alternative tanks

Here's a great documentary video on a issues and concerns with building a Hank Drum from alternative tanks with Hank builder Forsyte Stahlen. Forsyte explores some of his recent experiments in building Hank Drums.

Saturday, June 28, 2008

Hank Drum Magnetic Tuning by Milltone

Larry, drum maker at Milltone Drums has demonstrated a new design using magnets to achieve a tunable Hank Drum. This is a very cool concept. He's finished his first drum and I believe that it'll be for sale on ebay soon. Here's a YouTube Video of his creation:

Friday, June 13, 2008

Hank Drum Design Mistake


Don't Try This at Home!

I come before you humbled in this posting. I thought that I had a great idea to advance the design of the Hank Drum by accomplishing two goals:

1. Speed the cutting time for new drums.

2. Reduce the pain in @$$ cutting of the small curves in the tongues, and save blades lost when they break cutting the small curves.

So I sat down with Visio and designed a new tongue design which (on paper) seemed like a great idea. I borrowed the concept from woooden tongue drums which I have played in the past. In the picture to the left you can see the basic design, a large hole cut from the center and then the tongue cut back from there...

Well, the result was not what I expected at all...
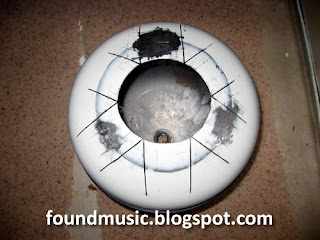
From the picture on the right, you see the completed drum. BUT it doesn't sound great at all. After the initial removal of the hole in the center (5" in diameter) the drum sounded like a Tibetan Bowl!

Even after I cut the first tongue (the lowest D note) the drum sounded great. The low D note rang for a long time. But as soon as I cut the second tongue, the whole drum design went south... the addition of a second tongue confounded the first note and neither note sounds good. To complete the experiment I finished cutting the whole thing out. I did achieve one goal - the total cutting time was less than an hour!

My advice: don't waste $30 in this design direction. But I am going to salvage the tank by cutting out the tongues and getting back to that awesome sounding large Tibetan Bowl!

Check out the Hank Drum Collective: http://hankdrum.collectivex.com

Wednesday, June 11, 2008

How to build a Hank Drum: Removing the Valve

I took a few photos during my last build. During this build I prepped 5 tanks, so I learned a bit about setting up a rig to help make value removal easier. Without the rig, I actually damaged the handle on the tank, because I put too much pressure on the wrench to attempt the removal. Here's a photo of a damaged tank, the arrow shows the warped area of the handle. I was able to remove the valve on this tank, once I experimented with, and created the rig. Remember to only attempt this with a new, never been filled tank.


What I engineered was a rig, using my Black and Decker portable workbench. I also used a tie-down strap with a tightening ratchet to hold the tank body in place. Final, I used a 12 inch adjustable wrench and a 1.25 inch diameter by 3 foot pipe extension for leverage on the wrench. This made the process a piece of cake. Note that I used a steel crow bar, secured in the workbench, to keep the tank from rotating.

I used the same rig to remove the metal bracket on the bottom of the tank. This part of the tank becomes the playing area.


Here's a view of the tools needed to remove the tank valve:

Tuesday, June 10, 2008

Milltone Hank Drum Youtube Video

Here's a great video from Larry over at Milltone Drums, as he tours some of the design features on his new drum.

Monday, June 09, 2008

Hank Magic Video

Here's a short Hank Drum Video:

Sunday, June 08, 2008

The Hank Drum Collective Group site

I created a new online community called: The Hank Drum Collective

This online community is designed to enable discussion of all aspects of the Hank Drum. It includes online discussion groups, a calendar and file storage area to enable communication between members.

Membership is free, and you can browse the information without being a member.

Link: http://hankdrum.collectivex.com/main/summary

Hank Drum tuning concerns

I am not sure if other Hank Drum builders are having similar issues, but I've noticed that the first Hank Drum that I built 2 months ago has gone out of tune. I was rechecking the tuning this weekend before painting it, and I noticed that all of the notes are about 10-15 cents flat.
When I built this drum, each note was dead on in tune. Now it appears that all of the notes have gone flat. It still plays well and sounds good, but I am concerned that it's out of tune and won't play well with my Native American Flutes.

Has anyone else experienced this?

A couple of thoughts that I have:

1. The drum has been unpainted since I built it. There has been some minor rust formed along the edges of the tongues and the area where the welds were removed.
2. The drum has spent a good part of it's life outside on my (covered) deck. It's get's played often.
3. I play primarity with super ball mallets rather than my hands.

Monday, June 02, 2008

Alternative Hank Drum Tuning Configurations

I had a busy weekend experimenting and building several Hank Drums from propane tanks. I am busy editing all of the video footage that I took, in order to create a "How To" video which I'll be posting on YouTube soon. I prepped a total of 5 tanks this weekend (removing the values and the metal foot, and grinding down the welds). Along the way, I learned and mastered several time saving techniques to improve the speed of the work. You'll be able to see the rig that I created for holding the tanks while removing the values. This is the biggest pain, and once I figured it out, it became simple enough that I can have the value off the tank in under 2 minutes.

The other key piece of advice is that you must have a portable grinder to remove the welds from the bottom (playing surface) of the tank. Unfortunately, the tanks that I bought were made by an overzealous welder during manufacturing. Each weld (four all together) was about 1/2 of metal attached to the tanks. I ground the first tank with a file - needless to say it took over an hour and a half...

The next day, I borrowed a portable grinder (the type used for autobody work) from my brother in law, and I was able to grind the remaining four tanks in under an hour total. The trick here is to not let the powered grinder dig into the surface of the tank to produce any 'channels'. It's impossible to clean those up, so stop short of the final grind and finish with a file.

In the meantime, I discovered one new tuning idea with Dennis Havlena's original tuning configuration. I had emailed Dennis after my first build, because the highest two notes (the C and the F, next to the low D "ding" note) didn't have great ring or sound. My theory was that they were too close to the center, and didn't have a stable base to ring appropriately. Thus, I theorized that moving them outward from Dennis's original plans would make them sound better. Indeed, my first drum that I built this weekend, I moved both of these notes out towards the perimeter of the body by almost an inch. The result was perfect, with both of these notes provided much better clarity and ring.

Here's an illustration of Dennis's original configuration (in D Minor Pentatonic)


The second drum that I built this weekend has a different tuning, still in the key of D minor Pentatonic, but with a different configuration of notes that I had proposed in my prior Blog posting: http://foundmusic.blogspot.com/2008/05/how-to-improve-your-hank-drum.html

The notes are (lowest to highest):

D F G A C D* F* G* *octave

The drum which I made using the following configuration came out really nice. I'll post pictures and a YouTube video, as soon as it final tuned and finished (Iater this week). The different configuration of notes has a different vibe. I think that it brings out different songs, and since it matches the tuning of a Native American Flute, it'll be really nice to play along with.

Link to Dennis's plans: http://www.ehhs.cmich.edu/~dhavlena/for-webpage-lp-hang.htm

Friday, May 30, 2008

HAPI Drum by Didgeridoo Store - a commercial Hank Drum

Check out this new drum produced by the Dideridoo Store. They've named it a HAPI (Hand Activated Percussion Instrument).
The drums are available in either the pentatonic key of D or E.
If you wanna get your hands on a really nicely manufactured instrument, check it out here:

Or here: http://www.hapitones.com/

Here's a video:


Friday, May 16, 2008

Completed Hank Drum Ideas

I had the opportunity to take my completed Hank Drum to the Northern California Flute Circle's Spring Flute Festival, which was held on April 26 -27, 2008 in Georgetown, CA. I left the Hank Drum at one of the flutemakers booths while I was working another booth. I came back later in the afternoon to hear tales of lot's of folks stopping by the play the drum!


One of the folks who was intrigued by the sound of the Hank Drum was flutemaker Russ Venable. Russ is an expert craftsman and he has been making Native American Style and transverse flutes for many, many years. Russ asked about the construction of the drum so I promised that I would send him the link to Dennis Havlena's site with the build instructions. (http://www.ehhs.cmich.edu/~dhavlena/for-webpage-lp-hang.htm)


Low and behold a few weeks later, Russ dropped me an email to tell me about his build of a Hank Drum. He was enthralled with the ease of construction and the beautiful tones that he was getting from his completed drum. At that point, he hadn't finished painting the drum, but since it was his first drum, he thought that a simple spray paint job with some spray paint would do just nicely. As you can see from the pictures, his drum came out fantastic. I'm painting mine this weekend with a basic spray paint job. Notice also that Russ took off the metal hooks on the blank rubber cords and fastened the ends together with a line of cord (actually, you can't see this in the pictures). Finally, I was impressed by Russ's ingenuity with the creation of a base from a piece of pipe, a pipe fitting, a piece of wood and and some rubber feet. (see photo on right)

All-in-all, a great finish to his first Hank Drum project.

Kudos to Russ!

Check out Russ's other musical creations on his website: http://www.rvflutes.com

I'd love to see other finished Hank Drums. I'll post the pictures here if you send them to me.

Thursday, May 15, 2008

How to improve your Hank Drum

I'll be building several new hank drums in the coming weeks. I plan to photograph and videotape the whole process in greater detail this time. In the meantime, I am considering several improvements to the next build. Below are some of my ideas. Feel free to comment if you have anything to contribute to the discussion.

Idea 1 - Move both of the high A and high C tongues further out towards the perimeter of the drum surface. If you've attempted to build the Hank Drum by religiously following Dennis Havlena's plans, (link: http://www.ehhs.cmich.edu/~dhavlena/for-webpage-lp-hang.htm) then you'll find that these two tongue end up in the metal between the low D and the low F and low G tongues. They're darn hard to tune and they don't ring too long. Thus, the experiment to move them closer to the perimeter of the drum.

Idea 2 - Replace the high A and high C tongues with other notes within the D pentatonic scale. The idea here is that if these notes are too short to make a nice note, replace them with a longer tongue and a note that will sound better.

If you not familiar, the basic D minor pentatonic scale is made up of the following six note (in order lowest to highest):

D F G A C D* *octave

The notes currently in Dennis's plans (for the eight tongues) are (in order lowest to highest):

D A C D* F G A* C* *octave


One proposal is to replace the high A and C with the following configurations:

D F G A C D* F *G * *octave

Idea 3 - Of course there are other scales which can be made from eight notes. The easiest extension is to create the D minor scale which would use all eight tongues to create an full octave of notes:

D E F G A A# C D


Idea 4 - One of my favorite scales is called the Spanish Gypsy or "Abba Rabba" scale. In the key of D, this would be:

D D# F# G A A# C D

Friday, February 08, 2008

New "Oscar" Hank-like Drum from Tribal Thunder


Tribal Thunder has produced a Hank-Drum derived instrument. Each drum has 6 notes, in a pentatonic scale. It looks like they are possibly welding the tops of two propane tanks together to make a much shorter (about 9" tall) and easier to handle drum. I really think that they have done a great job developing this instrument. The paint colors are awesome. You can play it with either your hands or mallets.
Cost is $400.
Links:

Saturday, January 26, 2008

How to Build a Hank Drum

Over the holidays, I had some down time to finally build a new "Hank Drum" based on the plans by Dennis Havlena. Here's a link to the plans: http://www.ehhs.cmich.edu/~dhavlena/for-webpage-lp-hang.htm


I've been in love with the Hang Drum, but alas, I haven't been able to find an affordable one to purchase yet (but you can read more about that adventure on my other posts).


Here's the story about my creation process in building my own Hank Drum.


Step 1: Purchase a brand new 20 lb propane tank. NOTE: like Dennis recommends, ONLY USE A NEW NEVER BEEN FILLED TANK.


Step 2: Remove the value. I released the air pressure inside the tank with a screw driver by turning the screw on the side of the valve. Then I used a large adjustable wrench and some leverage to move it. This will take some strength and possibly addition help to hold the drum and turn the wrench. In the picture, you'll see how I secure the drum with a crowbar.


Step 3: Remove the bracket from the bottom of the tank. This will become the playing surface of the drum. I used a 10" adjustable (monkey) wrench, tightened to the dimension of the metal on the bracket. I then worked it back and forth over each weld until the bracket broke free. After breaking off the welds, be sure to file down the weld mounts until they are flush with the surface of the 'drum head'.


Step 4: Printout the pattern from Dennis's website and enlarge the pattern on your scanner or a copy machine until it is the correct dimension. Position this pattern overtop of the "drum head".


Step 5: Trace the pattern onto the surface of the drum. I used a sharpie pen to copy it. This turned out to be a pretty good idea, as the saw scratched up the surface pretty good and I was using oil to help the cut. If I had used a pencil or a water soluable pen, the lines would have been messed up.


Step 6: Cut the tongues out with a jigsaw and metal cutting blade. Follow Dennis' advice on grinding down the blade to cut the tight radius. I went through two blades to cut all of the tongues out. Here's where I made one variation from Dennis's recommendation. Instead of drilling three small holes (my cordless drill battery is pretty shot anyway), I used a dremel tool with a cut-off wheel to start the cut, right on the line of the tongue. (I apologize that the image is sorta blurry). From here it was easy to cut out the rest of the tongue. NOTE: As Dennis recommends, make sure that you stop short on each tongue. This leaves you room to tune each tongue later.


Step 7: Tuning the drum. This is the step where you have to be the most careful. You'll need a digital tuner to complete this step. I started with the biggest tongues first. I used a hacksaw blade with half of it covered in electrical tape, to extend the cuts of each tongue until it was in tune. Note: as shown in the picture, I used eletrical tape to deaden the other tongue while I tuned a specific tongue. I also followed Dennis's advice and left the larger tonque's "open" when tuning the highest two tongue. I am still not completely happy with the tuning or performance of the highest two notes, they "sound" but they don't ring very long.


Step 8: Add a couple of rubber tie down's to the middle of the drum. This helps to dampen the ringing.


Step 9: Play your drum!

Additional thoughts:

First of all, props to Dennis Havlena for his incredible ideas! Keep 'em coming...

Second, I took a dowel, inserted it though the value hole, placed the end on the backside of a tongue and then hit it several times with a hammer. This pushed the individual tongue "up" above the surface of the tank bottom. I think that this make it more playable.

Third, I've also been playing around with the strategic placement of modeling clay on the tank bottom to help eliminate some of the overtones, attempting to get a purer sound.

Fourth: Check the "How To" link section on the sidebar of the blog for additional blog entries on Hank Drum construction.

I'll post a YouTube video once I get a moment to record something.

Join the Hank Drum Collective: http://hankdrum.collectivex.com